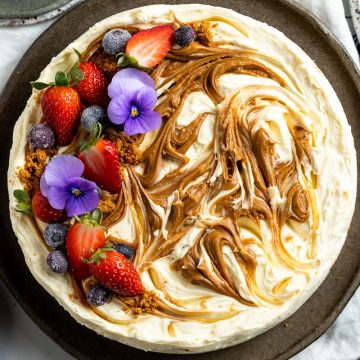
Biscoff Cheesecake
With a crunchy Lotus Biscoff biscuit base and swirls of Biscoff cookie butter throughout the vanilla cheesecake topping, this no bake Biscoff cheesecake is a delicious dessert for any Biscoff fan!
Equipment
- 1 Springform or loosed base tin 21cm / 8 inch round tin
Ingredients
Cheesecake Base
- 300g (10.5oz) Biscoff Biscuits
- 140g (⅓c + ¼ c) butter
Cheesecake toppings
- 500g (17½ oz) cream cheese, full fat room temperature
- 45g (⅓ c) icing sugar / confectioners sugar
- 300ml (1 ¼c) cream, double cream or thickened cream cold
- 1 Teaspoon vanilla extract / vanilla bean paste
- 3 Tablespoons Biscoff spread smooth
- 2 Teaspoons Biscoff spread for top, optional
- fresh / frozen berries for decoration, optional
- 2 Lotus biscuits finely crushed, for decoration, optional
Instructions
- Line the base and sides of the tin with baking paper / baking parchment.
- Melt the butter in the microwave or in a small saucepan over a medium heat.
- Crush the Biscoff biscuits to fine crumbs - either in a food processor or by hand. See note 1. below for my preferred way by hand.
- Pour the melted butter in to the crushed biscuits and mix thoroughly to coat all the crumbs in butter.
- Tip into the prepared tin and press down with the back of a spoon pushing it to all edges of the tin and smoothing the top down.
- Place in the fridge for 30 minutes to set.
- After the cheesecake base has been in the fridge for half an hour, make the cheesecake topping.
- Pour the cream in to a medium sized bowl and using a hand mixer whisk the cream to soft peaks.
- Tip the cream cheese in to another mixing bowl and add the vanilla and icing sugar / confectioners sugar.
- Beat with a spoon until well combined, or use a hand mixer (it doesn’t matter if it has cream on the whisk.)
- Fold the whipped cream in to the cream cheese mixture.
- Take a half of the cream cheese / cream mixture and spoon on to the cheesecake base.
- Dot half of the Biscoff spread over the mixture and swirl with a blunt knife to create a marble pattern.
- Top with the rest of the cheesecake mixture and then dot spoonfuls of the rest of the Biscoff spread on top and drag a knife through the spread to create a marble pattern.
- Place in the fridge for at least 4 hours - ideally 6-8 hours or overnight to set.
- To serve, remove from the tin and decorate with fresh or frozen berries and extra Lotus Biscoff crumbs.
- Serve straight away once decorated.
- The cheesecake will keep, covered, in the fridge for up to 3 days but is best eaten 24 hours after it is made. It is still edible - and delicious - after that time but the base becomes a little softer and it's not quite as impressive.
Video
Notes
Note 1. Use the end of a wooden rolling pin to bash the biscuits in to fine crumbs.
Lotus biscoff biscuits – you can also use speculoos biscuits.
Biscoff spread – I recommend you use smooth cookie butter spread rather than crunchy for the best smooth silky cheesecake texture.
Butter – I prefer to use unsalted butter in this recipe. It can be cold butter as it will be melted before making the cheesecake base.
Cream cheese – block Philadelphia cheese is best to use when making cheesecakes. The tub variety of cream cheese is made to be spreadable and therefore will not create the same set cheesecake topping.
Cream – Use double cream or thickened cream. If you are in the UK, using double cream will create a firm cheesecake. Using whipping cream will provide a softer textured cheesecake but it should set in the fridge, although it may not cut quite as cleanly.
Vanilla – vanilla extract or vanilla bean paste. Adds a background sweet flavour to the creamy cheesecake.
Fruit – fresh or frozen berries, strawberries, raspberries, blueberries, blackberries, for the cheesecake decoration, optional.
Can you use a loose bottomed tin for cheesecake?
Yes you can use a loose bottomed tin for cheesecake. Once chilled, place the base of the tin on an upturned bowl or mug (it should be narrower than your tin) and slide the tin down. Warm the tin slightly with a warm cloth if the cheesecake is sticking to the tin.
Why is my no bake cheesecake soft?
The cheesecake needs to be chilled for at least 4 hours – ideally 6 to 8 – to allow the cheesecake topping to firm up. If the cheesecake is soft it may need to be chilled for longer, or if in a rush place in the freezer for an hour (no longer as texture can change.)
Recipe tips
Make sure the cream cheese is room temperature – this will make it easier to work with and avoid a lumpy cheesecake filling. However the cream needs to be cold in order for it to whisk into soft peaks properly. Whip the cream separately then fold it in to the cream cheese to get the lightest cheesecake texture. The base in this cheesecake recipe is thick as we love a chunky biscuit base on the cheesecake. However if you are not such a fan you can reduce the biscuit amount and butter by a third. The base can be hard to get a spoon through too, again something we like, but if you want a slightly softer base add a little less butter. The cheesecake will be easier to cut in to neat slices if it has been in the fridge for at least 4 hours. Even better if left for 6-8 hours, or overnight. Decorate with berries just before serving. If using frozen or fresh berries the juices can seep in to the vanilla cheesecake causing it to look a little messy. Still tastes great though!Nutrition
Calories: 413kcalCarbohydrates: 28gProtein: 4gFat: 32gSaturated Fat: 17gPolyunsaturated Fat: 3gMonounsaturated Fat: 8gTrans Fat: 0.4gCholesterol: 67mgSodium: 297mgPotassium: 81mgFiber: 0.3gSugar: 16gVitamin A: 873IUCalcium: 48mgIron: 1mg
HAVE YOU MADE THIS RECIPE?
I'd love to see your creation!
Tag me! #atmrsjoneskitchen
Tag me! @atmrsjoneskitchen
Or just leave a comment below!